


2. Is the topcoat necessary? I've noticed most brands do not offer the topcoat.
4. I want a base coat color other than the ones pictured on your site. Can you custom tint the epoxy?
7. Can you use this product on exterior sidewalks too?
10. How does your product compare to the big box stores (aka home depot/lowe's) product?
11. Do you have a downloadable brochure that I can print out?
12. Who is Norkan? My package says it was shipped from Norkan Inc?
13. Where can I find decals like the ones that you show on your website? How are they applied?
15. I've read that a primercoat will help with longevity? Do you have a primer epoxy available?
16. Can I use your epoxy to cover Wood, Steel, Metal, Ceramic Tile, or Fiberglass?
18. What's the best way to disperse the chips? How about Non-skid and Clearcoat?
19. My garage is already coated with an epoxy, what do I need to do to prep the floor for a new coating?
20. Hey, I have a wooden car hauler, can I apply this on a wood sub floor?
21. When is the best time/temperature to apply my floor coating?
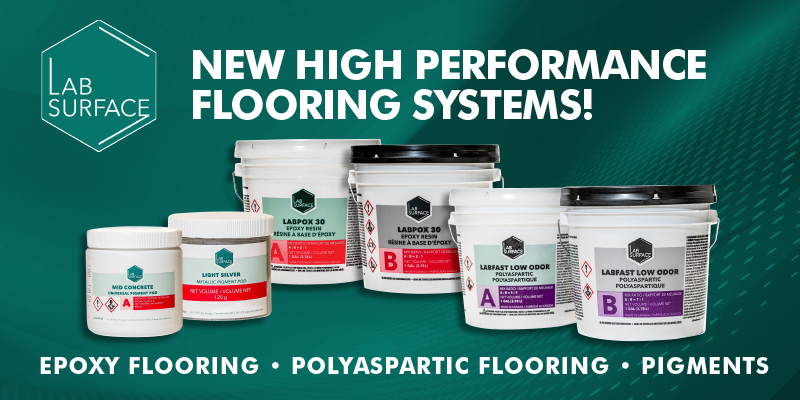
24. Do you carry 100% solids epoxy as well?
25. When I mix/apply my clear coat it turns milky white. Is this normal or did I do something wrong?
29. When is the best time apply a subsequent coat after the primer and after the base coat?
31. What is the difference between these two kits? Standard 1 car garage kit / Deluxe 1 car garage kit
1. Do you have a product that will withstand extremely heavy traffic as well as heavy machinery such as hi-lows, floor jacks, etc? I heard solvent-borne epoxy is more durable.
Yes. We do offer a solvent-based industrial-grade version of the floor coating kits as well as 100% solids epoxy floor coating kits. There are several different types of systems available depending on your project. Please fill out our form here or call (1-800-227-8479) or email us for a quote. Be sure to have the square footage of your surface before contacting us (length x width).
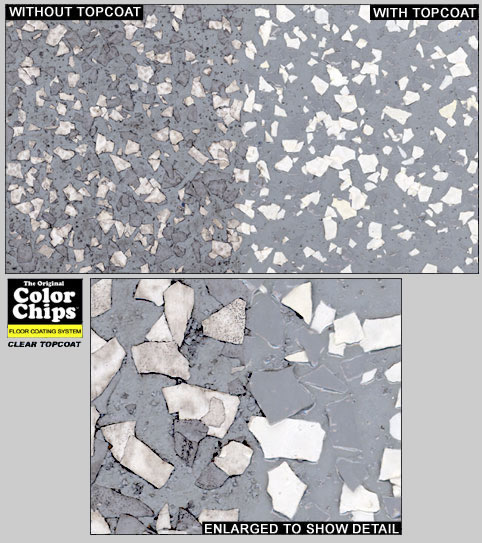
2. Is the topcoat necessary? I've noticed most brands do not offer the topcoat.
Much of our competition do not offer a clear top coat. We have found that the topcoat is completely necessary. Applying the topcoat will seal in the chips, provide a uniform, high gloss sheen and add yet another protective layer to your floor. When we have installed floors without the clear topcoat we have found that yellowing (or ambering) is much more likely to occur. Even light traffic can cause the chips to curl or discolor. In most cases dirt and debris get easily lodged around the chips.
In the example below, half the floor was applied with the clear coat and half without. We took an oily/dirty rag and rubbed down the entire section on both sides. After waiting 48 hours, we took a clean rag and rubbed the dirt and oil off. You can see that the side with the clear coat easily wiped clean, while the side without left a dingy residue over the surface.
3. Do your color chips work with other epoxies or urethane? Will they work with waterborne products as well as solvent based products?
Yes. They will work with any epoxy, polyurea, polyaspartic or urethane product, whether it's water based, solvent based, or 100% solids.
4. I want a base coat color other than the ones pictured on your site. Can you custom tint the epoxy?
Yes. We can custom tint the base coat epoxy if you need two or more gallons; in two gallon increments (example, if you need two gallons or four gallons, or six gallons, and so on). Your best bet is to get a paint card from your local paint store (it doesn't matter which one) and tell us the color brand / name / number, and we can use our software to custom tint your base coat! Note: Only the Basecoat epoxy in the System #4 can be custom tinted.
5. Do your color chips provide a non-skid surface? Do I really need the non-skid additive?
The chips will provide a very small amount of non skid. Once you clear coat over the top of the chips it seals them in and puts the shiny gloss coating over them. This does make the floor slick when water gets on the surface. The non skid is applied as the chips are applied into the base coat epoxy, thus providing additional texture to the surface. Application: Surfaces coated with high-gloss epoxy may become slippery when wet. For additional slip resistance in areas of pedestrian traffic, use the Non-Skid Additive. While applying your color chips, take the shaker can of the non-skid grit and sprinkle it into the wet base coat. Be sure not to apply non-skid in a high-concentration (the more you use the more visible). One can at a pretty high concentration can cover 500 square feet. An alternative way of doing it would be to sprinkle into your wet topcoat then backroll over it with your roller (one roll forward with your roller, sprinkle your nonskid, then roll your roller back over it). But that can make it too non-slip, by the granules getting caught in mops, etc.
6. I have seen a lot of products that say if my floor has any moisture, the epoxy will not adhere properly. Does your product have issues with garage floors that have moisture?
Our Waterborne Epoxy (Norklad WB) will hold up to 3 lbs of MVP (Moisture Vapor Pressure). A normal "non-sweating" garage floor has around 3 lbs of MVP. To Test if your floor has excessive moisture. Tape a piece of plastic, 12" x 12" to the Floor and let is set for 24 hours. Check the plastic and see if moisture develops on the back of the plastic. If moisture develops then our epoxy floor coating might not be in your best interest. Search out "Breathable" Epoxy.
7. Can you use this product on exterior sidewalks too?
It is not recommended to use this product outside. Exterior exposure will cause early dulling, loss of gloss and increased ambering. Your best bet is to use a concrete stain or tintable urethane, and add the color chips on the first coat of it.
8. My floor has been painted in the past, but has completely lost its coverage in the some areas where the car is parked in the winter. It's very old and deteriorating in these areas (not flat, sort of crumbling). Can I use your product?
If your floor is crumbling, it would be best to take out all of the loose concrete, making sure only the pits remain. You can fill the pits in the concrete with a concrete patching compound, making sure the entire floor is level. Now if you have loose paint, you are going to have to grind that paint up with a diamond grinder, otherwise the epoxy will peel up with the paint.
9. Can this product be used to paint a Formica kitchen counter top or ceramic tile? Seems like if it is tough enough to drive on, it ought to be tough enough for counter use.
Our epoxy can be easily applied overtop of tile. The ceramic tile needs to be aggressively sanded/scarified prior to application (roughened up to resemble as least 80 grit sandpaper), the more textured the better. If you are unable to give it texture, at least dull the sheen so it is no longer glossy. It then needs to be primed with a waterborne epoxy primer. After the primer has dried you can use the standard kit, (wb base coat + chips + wb clear coat; or if you want a smoother glass-like finish use wb base coat + chips + Norklad 100 – 100% solids Clearcoat).
10. How does your product compare to the home depot/lowe's product?
Essentially, the epoxy-shield and the original color chips product are both waterborne 2-part epoxy coatings. A) We have no tire lifting problems. B) Most home depot stores do not offer the clear coat epoxy (or urethane) which adds another layer of protection as well as provide a high-gloss sheen. See question #2. C) While the rustoleum kits only have two colors of base coats to choose from along with the chips that go along with it, we offer eight standard base coat colors in addition to custom tinting and over 70 different chip colors and blends. D) There is little or no customer service with the Rustoleum/Behr product if your problem doesn't fall within their specific guidelines. On the other hand, we will do whatever it takes to make sure your floor is what you intended it to be.
11. Do you have a downloadable brochure that I can print out?
Yes, it's primitive (work in progress). Download it HERE (.pdf, 9mb)
12. Who is Norkan? My package says it was shipped from Norkan Inc?
The Original Color Chips Company is the sister company of Norkan Inc. Norkan is a leading supplier of asbestos, mold, and lead abatement products as well as performance coatings and safety supplies. We are one and the same, even share the same warehouse.
13. Where can I find decals like the ones that you show on your website? How are they applied?
Most of our customers get custom stickers by "googling" the words vinyl stickers. Or head on over to Ebay and look there. APPLICATION OF STICKER: Apply your base coat and chips as normal, note where you want the sticker to be placed and do not apply chips to that area (just around the area). Once the base coat is cured enough to walk gently on, apply the sticker to the bare area where you didn't disperse the chips. At this point, you can degloss the sticker by lightly sanding it, or create a bond-coat by applying a clear spray on coating. You will need to use a CLEAR SPRAY-ON ACRYLIC SPRAY PAINT. Spray the entire surface of the vinyl, making sure to COMPLETELY seal in the edges of the vinyl. This will assure that your Original Color Chips clear topcoat will not curl the edges of your vinyl decal and that the clear coat has something to bond to. (without the spray paint, the clear coat will be able to just peel off the glossy sticker). Once your CLEAR SPRAY-ON ACRYLIC SPRAY PAINT is completely cured, apply the topcoat to your entire floor as you would any other floor. You can sprinkle more flakes around the edges of the sticker so they butt up against it, then back roll some Clearcoat over it. This will give the illusion that the chips were applied in the first coat.
14. We have a linoleum (sheet vinyl) floor. It is in good condition physically but the surface is scratched and dull. Can we apply your product over this existing floor without removing it down to the concrete slab?
Yes. As long as the floor is securely fastened to the concrete (not peeling up) you can put a coating overtop of it. To prep the surface for adhesion you will want to aggressively sand the floor to get a rough profile (should feel like 60-grit sandpaper or more coarse). We recommend using a floor grinder to scuff the surface, or pole sand it by hand. Then sweep or rinse debris away and start coating. Most importantly, the surface must be textured.
15. I've read that a primercoat will help with longevity? Do you have a primer epoxy available?
You are correct. Priming the substrate will not only allow give you a higher build but it will assist in adhesion, giving your floor more longevity. We offer it as an option. There are several primer options available. 1) Norklad WB base coat/primer epoxy – This low-solids epoxy works excellent as a primer Norklad WB or Norklad 200 (100% solids epoxy. A clear version of Norklad WB called Preprime WB can also be used. 2) Devoe Pre-Prime 167 penetrating primer – This water-like primer really sinks down into the substrate offering superior adhesion to the Devoe 224V Basecoat Epoxy.
16. Can I use your epoxy to cover wood, Steel, Metal, Ceramic Tile, or Fiberglass?
Yes, however it must be primed. Our primer coat epoxy will also allow proper adhesion over a variety of substrates: Wood - Prime with Original Color Chips Basecoat Epoxy. Dilute with 8 ounces of water per gallon or prime with waterborne primer. Steel - Prime with waterborne epoxy primer. Galvanized Metal and Aluminum - Prime with waterborne epoxy primer. Glazed Brick, Ceramic Tile and Fiberglass - Scuff sand and prime with waterborne epoxy primer.
17. Where I live our winters are pretty harsh. My 2-car garage is painted with epoxy, and when snow melts off the car and lands on the floor it just sits there and forms a puddle. I have no idea how to contain this problem.
Epoxy makes a great surface for a garage floor because it's easy to clean. But it also prevents moisture from being absorbed into the concrete, so puddles tend to stay around longer. Short of wiping snow off the car before you drive in, about the only thing you can do is to place a large "welcome mat" under the car. Various mail-order companies offer these car-size vinyl mats, which have shallow grooves to contain the slop and protect the epoxy from road salt and grit. Come summer, you can just roll up the mat and store it until winter. Or keep it on all year round to maintain your floor's lifespan.
18. What's the best way to disperse the chips? How about Non-skid and Clearcoat?
CHIPS: First, be sure you have enough chips to do the entire surface. Calculate 1 bag per 250 square feet (or the size of a single car bay) for a light sprinkle, 2 bags per 250 square feet if you are doing a medium sprinkle, etc. That way you will get a more uniform coverage. Throw chips upward not downward (almost like you are shooting a basketball or "feeding the chickens", using only a pinch at a time). A second person wearing spike shoes or golf cleats will give you the ability to walk onto the wet epoxy while you are throwing your chips, which is the easiest way to get a more uniform coverage. If you do not have spike shoes or golf cleats, the second person may apply chips in conjunction with the first person rolling the base coat.
NON-SKID: Surfaces coated with high-gloss epoxy may become slippery when wet. For additional slip resistance in areas of pedestrian traffic, use the Non-Skid Additive. While applying your color chips, apply into the wet base coat or use in clear coat by rolling forward, sprinkling, then backrolling over once again. Be sure not to apply non-skid in a high-concentration. Sprinkle at 1 can per 500 square feet or more using the easy sprinkle can.
CLEARCOAT: Once you're ready to apply the topcoat (waiting overnight for the base coat to efficiently cure), mix Part A and Part B together (equals one gallon). Refer to the base coat mixing and application instructions for the topcoat. It will be the same procedures. Be sure to roll one even coat of Crystal Clear topcoat over the entire surface to be coated (we recommend a good 3/8" nap roller). Material will go on as a milky white (may even look like white paint) and dry crystal clear. Smooth out any visible clumps of clear coat. If you come to the end of your floor and you still have clear coat left over do not use the mixed material to add thickness to the layer you just put down. Discard unused material (if mixed). Applying clear coat overtop of itself without waiting for the first layer to cure will cause curing problems. If you decide to double coat the clear top coat, please allow a minimum of 14 hours for the first layer to cure before attempting a second coat (heavy or full broadcasts of chips often calls for a double layer of clear coat).
19. My garage is already coated with an epoxy, what do I need to do to prep the floor for a new coating?
COATING A PREVIOUSLY PAINTED SURFACE:
If your previously painted surface is lifting: The waterborne components of this product allow use over most old coatings. Old coatings should be tested for lifting. If they lift, remove them as best you can. If the floor is painted and the paint is peeling off at an accelerated rate, most likely any epoxy you apply will also peel off as well. If the initial coating did not bond well, neither will anything you put on top of it. Basically this is caused by coating improperly prepped concrete with the original coating. Grinding the existing paint off with a floor grinder / diamond grinder / scarifier is recommended (Floor grinders may be able to be rented locally, but we do carry them in our store as well: See our online store), or chemicals may be used to remove it. Once the coating has been stripped off, etch the surface as you normally would (acid wash or grinder). The entire bare concrete surface should resemble 80 grit sand paper (or more coarse), so that the new epoxy coating will adhere properly.
If your previously painted surface is NOT lifting and just wearing out: If the coating is securely adhered to the concrete you do not need to remove it. Simply dull glossy areas by light sanding. Remove sanding dust. Remove any debris and clean thoroughly with TSP (Trisodium phosphate). A good way to test for lifting and prep your surface for another coating is to sand the entire floor (pole sanding works well), rinse away debris, allow to dry then start painting. Check surface to make sure it is no longer glossy, epoxy will stick to epoxy if the previous coating has been dulled out. If the coating is textured, even better. NOTE: The Etch n’ Clean solution is not necessary when coating overtop a previously painted surface.
20. Hey, I have a wooden car hauler, can I apply this on a wood sub floor?
APPLYING ON WOOD: You will need two coats of base coat epoxy when coating wood. Fill in any seams with a self-leveling sealant or patching compound. Prime the surface with base coat epoxy thinned with 8oz of warm water per gallon. This thinned coat will soak into the wood, creating a bonding agent for your second-layer of base coat. You would then apply your actual base coat and chips, followed by the clear coat as normal.
Note: You do not need the Etch n’ Clean for coating a wood surface, just a double base coat.

21. What is the best time/temperature to apply my floor coating?
TEMPERATURES: Do not apply this product when temperature is below 50 degrees Fahrenheit. Do not use a heater/space heater to speed up the curing/drying times. The large amounts of carbon dioxide emitted by heaters can cause a disruption in the curing process and create yellowing. Applying this product in cold climates (when surface is between 50 degrees and 60 degrees) will not affect the protective properties, however it will double drying⁄curing times.
22. How tolerant is an epoxy floor to water exposure? In cases of extreme rain/flooding conditions, my basement will take on water in certain areas. This does not occur often, but enough to make carpeting unsuitable.
The epoxy is very tolerant to damp areas and even areas with continuous moisture, but any coating will have a more difficult time than on areas that don’t have moisture issues. Honestly, the best "assurance" that you won’t have any problem with peel-ups, etc. would be to use the waterborne epoxy primer first, then use the waterborne epoxy base coat over it. The primer is a low-solids epoxy that sinks deep into the substrate to get a better "bite" onto the concrete, so your base coat can go much further and have a much more uniform sheen and build.
23. I am looking for a full-broadcast chip coverage floor, can I achieve this with your product? I want to create the "granite" or "marble" look. Would the clear top coat included with the complete coating kits achieve the glossy shine of polished stone?
The waterborne epoxy clear coat will definitely give it a high gloss shine and offers excellent protection in basements, but it is a thin-mil coating so if you are doing a full broadcast color chip dispersion (no base coat showing, just chips exposed) it doesn’t offer much depth. You can achieve a great marble type look with an extremely heavy broadcast of chips (6 lbs. of chips per 250 sq/ft) and the waterborne clear coat. Because the waterborne clear coat is very thin, the more chips you use the more "bumpy" it can be. Although this helps in creating a great nonskid surface, if you want a completely level surface we recommend using the Norklad 100 – 100% solids epoxy. This clear coat epoxy is used in granite-look terrazzo floors and is 100% solids clear epoxy. Norklad 100 is a durable clear coat that is used on high-end floors (it’s actually 4x stronger than concrete). When applied at 100 sq/ft per gallon it self-levels around 16 mills thick. However, it only has a 30 minute pot life (time the material has before hardening once the part a and part b components are mixed together.) To achieve full broadcast chip coverage: Apply your base coat epoxy as normal, and sprinkle your chips; you would use 10 lbs of chips per 100 sq/ft., covering the entire surface so that no base coat is showing. After the coating hardens to the point you can walk on it, scrape the excess chips off with a scraper and sweep or vacuum up the debris. This leaves the floor much smoother. Then, broadcast your clear coat as directed.
24. Do you carry 100% solids epoxy as well?
Yes, It's called Norklad 200 and it's available in these colors: 100% Solids/Norklad 200 Color Chart (.pdf)
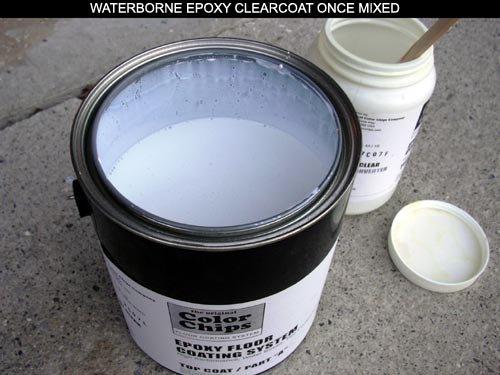
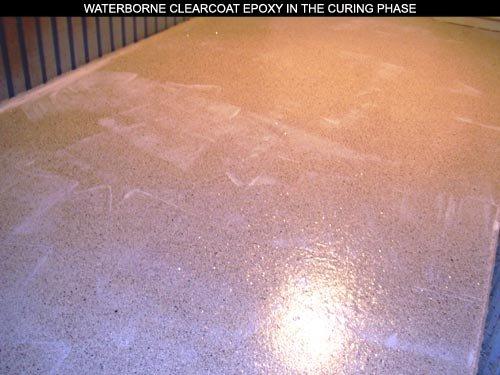
25. When I mix/apply my clear coat it turns milky white, plus it isn't a full gallon. Is this normal or did I do something wrong?
The waterborne clear coat epoxy is a thin mil coating that is geared to cover between 300-400 sq. ft. a kit (Part A Part B), so it is not a full gallon. It starts off white and turns crystal clear as it cures. Thicker areas take longer to cure and turn clear.
26. Can you provide maintenance information for epoxy floors? How often do they have to be cleaned, how to clean them, etc.?
Cleaning your floor all depends on the amount of foot traffic or vehicle traffic. You'll know when your floor starts to look dirty or filmy so use your own discretion when it comes to how often it should be cleaned. We have a product called FLOORSHINE that will do the job.
FLOORSHINE is the ultimate floor finish. A 25% solids, metal crosslinked, polymer finish will make your floors look wet even when they are dry. FLOORSHINE provides a good wax surface that lasts several months.
Follow these steps to keep that new floor shining:
• Sweep or blow loose dust and debris.
• In a bucket, mix a minimum of 1 cup vinegar to 2 gallons of warm or cold water. As an alternative, mix ¼” cup of fabuloso (or Simple Green) to 2 gallons of warm water. Do not exceed recommended concentrations.
• Mop the floor lightly with a dampened janitorial string mop. Remember that the floor may be slippery when wet.
• Allow the floor to dry. There is no need to rinse the floor.
• To accelerate drying time, a foam squeegee may be used.
Note: Do not use any kind of detergent as this may leave a film and diminish the natural beauty of your floor. The film residue will also attract dirt.
Lemon Damp Mop (available in our store) is a Neutral PH, rinse free cleaner that works well on epoxy coatings and waxed floors.
Other Cleaning Tips:
• Use CLR mixed with water to remove film which is caused by hard water, detergents, etc. CLR will remove the film and return the shine.
• Try OxiMagic Stain Remover to remove tough stains (available at Walgreen’s locations).
• If the odor of vinegar is too pungent, Use Lemon Damp Mop or Turle Wax Rinse Free Wash & Wax.
• Use WD-40 for sticky deposits (i.e; tar, chewing gum, etc) However, as the treated area will be very slippery as well, please follow the above cleaning instructions after using WD-40.
General Maintenance Tips:.
Immediately After Installation
• Keep everyone off the floor for the first 24 hours.
• Keep heavy objects or vehicles off for the first 72 hours.
• It will take the epoxy floor seven days to fully cure. We recommend that you do not scrub or wash your floor during the first seven days.
Preventative Maintenance
• Wipe up spills as soon as possible to avoid any potential staining.
• Sweep up dry dirt and stones on a regular basis which over time can scratch the topcoat.
• Keep the floor clean by washing with general purpose cleaner to extend life of coating.
Periodic Maintenance
• For rough textured surfaces, scrub with a bristle brush and a general purpose cleaning solution to dislodge the dirt. After cleaning, the floor should be rinsed with a hose to prevent the dirt from resettling on the floor.
Proactively Protect Your Floor
• When moving objects across your floor such as furniture, workbenches, or heavy objects, lay cardboard or wood paneling on the floor as a protective barrier to protect against scratching or gouging your newly coated floor.
• Place a walk off mat at door entrances to reduce the amount of dirt brought into your home.
27. How long, after having a new garage floor poured, do I need to wait before applying your product to concrete?
You have to wait a minimum of 28 days after the concrete has been poured before you can apply a coating to it. If you know you want an epoxy finish on it, make sure the contractors pouring the concrete do not add any ‘cure and seal’ products to it, and that they give it a broom finish. (not steel trowelled)
28. I purchased a kit with a heavy broadcast of chips and applied a single clear coat. I like the texture of it, as it provides a non-skid, pebbled look, but I really would prefer it to be a bit more smooth. Can I add another coat to it without having any problems?
Another coat of the WB Clearcoat epoxy won’t really smooth it out that much. You need something with a little more solids content. The Norklad 100, 100% solids epoxy has the ability to level out like glass if applied at 125 sq/ft per gallon. But you can squeegee and back-roll it as thick or thin as you want, so if you want a smoother look with a subtle texture, it can easily be achieved with the different clear coat. For the best bond, lightly sand the surface of the floor (to degloss) before coating with the Norklad 100. There are several different sizes available depending on your square footage. Click Here to See Our Clear Top Coat Kits.
29. When is the best time apply a subsequent coat after the primer and after the base coat?
If you are ready to apply your next coat, whether it's the base coat or topcoat, you must first be sure that all of the solvents or water have evaporated from the coating during the curing process. Generally, this happens within 8-10 hours, however it is best to test the coating before recoating or top coating. This can be done by pressing on the coating with your thumb to verify that no fingerprint impression is left. If no impression is created, then the recoat or topcoat can be started. Basically, the point at which you can no longer see your fingerprint is when you can successfully apply another coat.
30. I'm purchasing a new home, are there any steps that can be skipped since the garage floors are in perfect condition?
Actually, no. You must still etch the concrete. If there are no stains or dirt on it, you don’t have to concentrate on making sure it is clean. If there are stains on it from oil or grease, you must use a oil-emulsifier or a phosphoric acid cleaning solution (like our Etch n’ Clean solution) to bring up any of the oil. But most importantly, the pores of the concrete must be opened up to allow the epoxy something to sink into. You will need to either profile the floor with an acid-type solution (since muriatic acid is a better etcher than cleaner, and phosphoric acid is a better cleaner than etcher, we recommend using hydrochloric acid/muriatic acid). Even better yet, mechanically prepping the floor (using a floor grinder or shot blaster) saves time and can better prep your floor.
31. What is the difference between these two kits?
• Standard 1 car garage kit
• Deluxe 1 car garage kit
The standard kit comes with Etch n’ Clean, WB Epoxy Colored Basecoat, WB Clear Top coat, and a light sprinkling of color chips. The deluxe kit comes with Etch n’ Clean, WB Epoxy Primer, WB Epoxy Colored Basecoat, High Performance Urethane Topcoat, and a medium sprinkling of color chips. The Deluxe kit is designed for better adhesion and chemical resistance for your garage. After etching the concrete with the Etch n’ Clean solution (diluted 1 gal of solution to 1 gal of hot water), allow the concrete to sufficiently dry out. After that, apply your epoxy primer coat. This low-solids primer coat will sink deep into the substrate giving your next coat (base coat epoxy) more build, and uniform coverage (minimizing the risk of light and dark spots in your base coat which is caused by the concrete soaking up the epoxy in different amounts). After applying your base coat and color chips (comes with a medium coverage of chips), allow to cure overnight. The final step is the solvent-borne UV resistant urethane clear coat. This crystal clear high gloss coating will give you better chemical resistance and complete uv-protection (epoxies tend to get a yellowish tinge to them over time).
32. Our garage was already painted and probably sealed before we moved in. We would really like to purchase your product, however, we read that your etching solution does not cut through sealer. What can we do to unseal our garage so that we can use your products?
Unfortunately, your only option is to rent a floor grinder (or shot blaster) to remove the sealer. In most cases, you can rent them locally. The process is quite easy but absolutely necessary. The sealer will prevent any coating from being able to get good adhesion and will more than likely flake off upon application. You can test if the sealer is still active by pouring water on top of the substrate. If it soaks in without beading up or laying on the surface then the sealer is no longer an issue and can be etched using an acid solution.
33. I had this product done on my garage floor several years ago. There is an area that is starting to come up in about quarter size chips. Is there a patch kit available or must I have the whole garage redone? If I must have the whole thing redone must the old product be taken up or can it be applied over top?
You can repair just the affected areas without redoing the entire floor. We do have patch kits available. You can lightly sand around the area to be coated, clean with TSP or cleaner/degreaser, then coat with the epoxy repair kit. Peel ups are caused by the coating losing its adhesion to the concrete, so make sure the exposed concrete is free of debris and still has a rough texture.
34. Eh, I am from Canada and I am wondering how much shipping is and if there are any product shipping restrictions?
Hey Canada!!! You can calculate your shipping by using our shipping estimator (at checkout) and choosing your country. All water-based products can be shipped to Canada (WB base coat, WB clear coat, chips, etc.). Due to hazmat shipping restrictions, we cannot ship solvent based materials across the border.
35. After I applied my clear coat, I noticed tiny little bubbles on the surface. What caused this and how do I fix it?
The tiny little air bubbles are called outgassing. This can be caused by a few things:
1. Applying a clear coat in high temperatures or in direct sunlight can cause the coating to dry faster than intended. This causes air pockets to form during evaporation and curing.
SOLUTION: Apply your clear coat within the recommended application temperature and apply at sundown to avoid direct sunlight.
2. When using 100% solids, outgassing can occur because of the 100% solids fast cure time. This is caused by air and moisture migrating to the surface during curing process.
SOLUTION: Use a thin mil primer to prime the surface before applying a 100% solids coating.
FIX OUTGASSING: To fix the outgassing, lightly sand the bubbles and surrounding areas and recoat the problem areas. Clean the area before touching up. We have repair kits available for all of our products.
36. After I used your repair kit for my clear coat, I noticed the touch up areas are more glossy than the rest of the floor. How do I get my surface back to an even gloss?
Adding another layer of a clear coat will leave a slightly different gloss. You can achieve an even gloss by using Xylol (a thinning agent) on a rag and lightly wipe the Xylol over the touch up areas. By doing this, it will remove any excess gloss from the coating.
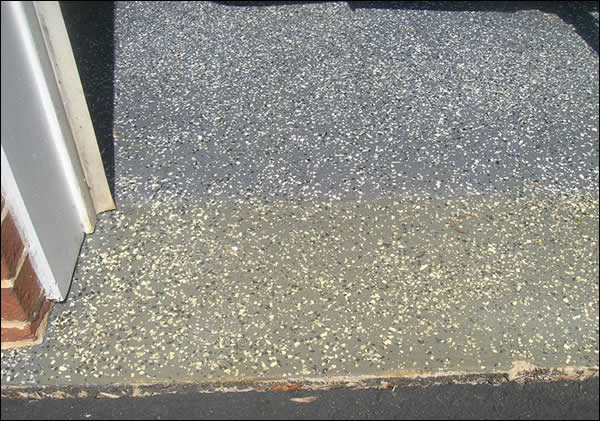
37. I recently applied epoxy on my garage floor and my lip (outside of my overhead garage door and to the end of my slab) of my garage turned yellow; what happened and what can I do to fix it?
The outside lip of the garage floor turned yellow because epoxy is not UV resistant. Direct sunlight will yellow or discolor an epoxy over time. By using a UV resistant coating such as a urethane, it will hold up longer to the elements of sunlight. Even a urethane will yellow in certain parts of the country. The photo below is from a home in Florida that had used a urethane clear topcoat. We do not recommend using an epoxy on any exterior surface.
To repair the yellowed areas, lightly sand the clear coat down as far down as you can without sanding the color chips. Recoat the area with a urethane clear topcoat. However, it is not recommended to go outside the lip.
Tape where the garage door comes down so the coating/flakes aren’t visible on the outside while the garage door is closed. It’s recommended to do this not only because the colors may not match the outside of the house but because the UV-Rays of the sun tend to discolor the coating. The urethane clear coat will help keep it from discoloring from the UV rays and the elements, but only to a certain extent. The thin coat of protective urethane will not prevent the colored base coat epoxy from discoloring, it will only slow the process down. After you tape a line from where the garage door comes down, apply your primer coat (peel tape off when wet) then once dry reapply your tape. Apply your base coat and color chips (peel tape off when wet) and allow to dry. Do not tape off again, instead when you apply your clear coat to the entire floor, extending beyond the area where you have taped off. This will seal the edge of the coating in and give the lip of the garage a wet look.
Note: use this technique when using urethane clear coat only. If you are clear coating with a clear epoxy, tape off where the door comes down to make sure it doesn’t extend to where the UV-rays can damage/discolor.
38. I removed tile in my basement and there is a black glue substance on the concrete; can I use your products to paint over that?
No, you can not put epoxy coatings on top of mastic glue. You must use a mastic remover such as Bean E-Doo Mastic Remover to remove residual mastic residue. We suggest that you also use mechanical preparation such as a floor grinder to profile the floor and remove any existing paint or glue.
39. Does your product come with a warranty?
9 times out of 10 the reason a floor coating fails is due to improper substrate preparation. One of the most difficult variables to get around is the fact that every concrete slab is different. Varying porosity, hardness, smoothness, and surface characteristics cause each job to have specific needs. For example, in some instances Etch N’ Clean will be enough to open the pores of the concrete, and sometimes it may require a more aggressive approach like using muriatic acid or even a floor grinder. Since we aren’t putting the product down and do not know what type of substrate you are applying the product to or different variables (i.e. hardness of concrete, etc), we cannot issue a warranty. However, we really do stand behind our products so if you experience ANY issues at all, we will stand behind you to make sure you end up with the floor you wanted. Don’t be fooled by competitors' "Lifetime Warranty" claim. The fine print says it doesn’t cover peel ups due to improper preparation, discoloring due to UV-exposure and more.
40. When I pulled my car out of my garage, I noticed black tire marks where I was parked. I tried to clean them off but it seems as if the tire marks (paw printing) stained the clear coat. What happened and what can I do to fix or prevent this?
Unfortunately this does occur, but it doesn't happen very often. With urethane coatings, some high-performance tires cause a chemical reaction and will leave tire staining (black or amber) or "paw printing" in the clear coat.
To prevent this, you can buy tire mats to go under your tires where you park in your car in the garage. If you do not like the look of tire mats on your garage floor, you can use a mopable floor wax to create a thin barrier between your tires and the urethane coating.
To fix this, you can lightly sand off the black tire marks and use our urethane touch-up kit to feather in the area. After you lightly sand the problem areas, wipe down the areas with a solvent such as xylol or xylene. A solvent will clean the area and help soften the coating for adhesion of the touch-up urethane clear coat kit.
41. After I applied the PrePrime 167 epoxy primer coat I noticed that my floor was splotchy and it didn't look like I had enough epoxy to cover the area. Did I apply the product wrong or not have enough material?
The above is a finished example of a dried application of PrePrime 167. Don't be alarmed by the coating looking splotchy. Some spots can appear dry and others may still look wet or tacky. This is exactly how a properly applied thin coat should look. It is deeply penetrating the concrete so your base coat will have superior adhesion.